As the days grow shorter and the air turns crisp, our thoughts inevitably drift towards cozy gatherings, warm beverages, and the comforting flavors of autumn. Fall entertaining often centers around an inviting cheese board, a culinary canvas ready to be adorned with a symphony of textures and tastes. But how do you truly elevate this seasonal masterpiece from delightful to unforgettable? The answer lies in a simple, yet utterly transformative, addition: sweet salty addictive candied pepitas.
Imagine tiny jewels of flavor, shimmering with a caramel glaze, offering a delightful crunch and a perfect balance of savory and sweet. These aren't just any pumpkin seeds; these are 3-ingredient candied pepitas, a fall staple that takes mere minutes to prepare but leaves a lasting impression. Far from being a mere garnish, these irresistible clusters become the star of any cheese board, an unexpected hero in your favorite salad, and an utterly sweet salty addictive candied pepitas snack on their own. Let's dive into the simple secret behind creating these culinary marvels and unlock their full potential.
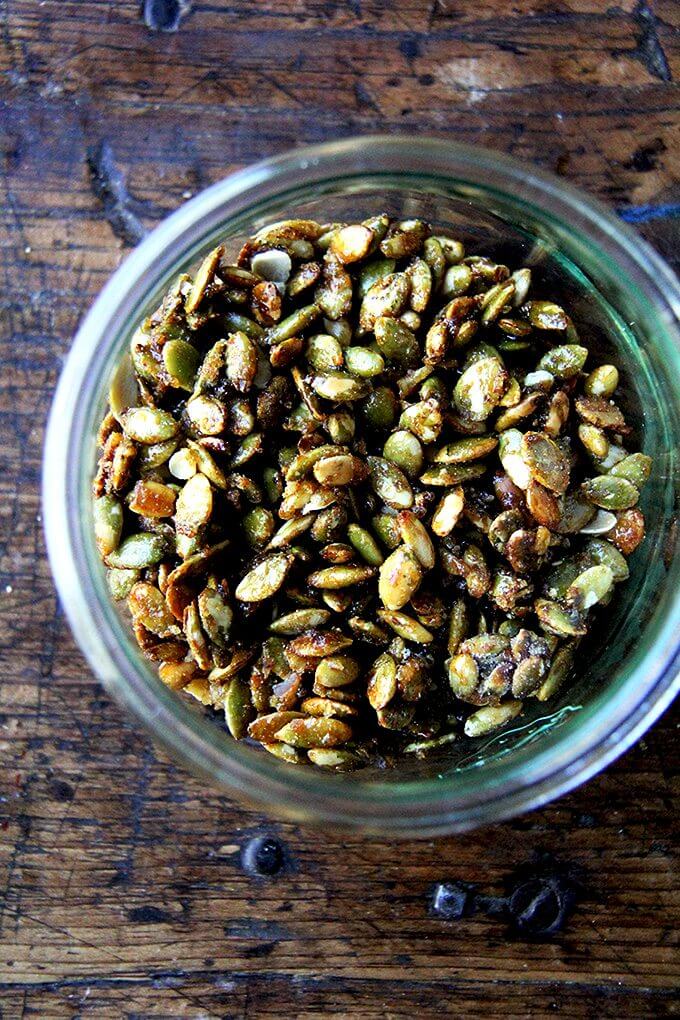
The Secret to Perfectly Glossy, Sweet Salty Addictive Candied Pepitas
The journey to truly spectacular candied pepitas begins with understanding a subtle, yet crucial, culinary tweak. Many traditional recipes for candied nuts or seeds involve toasting the seeds directly with sugar. While this method can work, it often results in seeds coated in a granulated, crystalized sugar crust. While still tasty, it lacks the elegant sheen and satisfying "clumpiness" that makes candied pepitas truly special. The secret to achieving that coveted glossy finish and the perfect sweet salty addictive candied pepitas clusters lies in a slightly modified approach: separate caramelization.
By toasting the pepitas alone first, allowing them to warm through and release their inherent nutty aroma, you prepare them perfectly for their sweet destiny. Then, the sugar is melted separately, transforming into a light, shimmering caramel. When these two components are introduced to each other, a magical alchemy occurs. Instead of a rough, sugary crust, the seeds become enrobed in a smooth, translucent glaze that hardens into beautiful, irregular clusters. These clusters are not only visually appealing but also incredibly user-friendly – easy to pluck from a cheese board or snack bowl, offering a delightful grab-and-go experience.
Why the Method Matters: Gloss vs. Crust
The difference between a "good" candied pepita and a truly "great" one often comes down to this method. When sugar melts directly onto seeds, it tends to crystallize around them, forming a rough, sandy coating. This can feel dry and sometimes brittle. Our improved method, however, focuses on achieving a liquid caramel state for the sugar. Caramel is essentially sugar that has been cooked until it changes color and flavor, developing complex, nutty notes and a liquid, adhesive quality. When the toasted pepitas are introduced to this liquid caramel, they are evenly coated, and as the caramel cools, it solidifies into a smooth, shiny, and glossy layer. This creates the desirable clumping effect, where a few pepitas stick together in delightful, bite-sized clusters, making every morsel a truly sweet salty addictive candied pepitas experience.
Your 3-Ingredient Lineup for Sweet Salty Addictive Candied Pepitas
You might be wondering what these three magical ingredients are. Prepare to be amazed by their simplicity:
- Pepitas (Raw Pumpkin Seeds): The star of the show! Ensure they are raw and unsalted to have full control over the final flavor profile. Their natural nuttiness and satisfying chew are essential.
- Granulated Sugar: The foundation of the caramel. White granulated sugar works perfectly for achieving a clean, sweet caramel flavor.
- A Pinch of Salt: The unsung hero! A touch of salt is what truly brings out the "sweet salty" magic, balancing the sweetness and enhancing the overall flavor, making them undeniably addictive candied pepitas.
That's it! No fancy syrups, no complex spices (unless you choose to add them later for variations). Just these three humble ingredients, combined with a clever technique, yield an extraordinary result in about 10 minutes of active work.
Beyond the Cheese Board: The Versatility of Candied Pepitas
While the title rightfully highlights their prowess on a fall cheese board, limiting these sweet salty addictive candied pepitas to just one use would be a disservice. Their unique combination of crunch, sweetness, and saltiness makes them incredibly versatile, ready to elevate a multitude of dishes and occasions.
Elevating Your Fall Cheese Board Experience
A cheese board is all about contrasting flavors and textures, and candied pepitas are tailor-made for this role. Their inherent sweetness beautifully cuts through the richness of creamy cheeses like Brie or triple-crème. The saltiness provides an intriguing counterpoint to mild, nutty cheeses such as Gruyère or Comté. And for those bold, pungent blues or assertive goat cheeses, the caramel sweetness offers a welcome reprieve, harmonizing the intense flavors. The satisfying crunch of the pepitas also adds a crucial textural element, breaking up the softness of cheeses and fruits. Scatter them around your cheese selections, arrange them in a small bowl, or even place small clusters directly onto individual cheese slices for a guided tasting experience. They pair wonderfully with other fall accoutrements like sliced apples, pear wedges, figs, or even a dollop of fig jam or honey, enhancing the autumnal theme with their sweet salty addictive candied pepitas charm.
A Game-Changer for Salads
Remember when candied nuts were all the rage in salads? Well, some trends are simply too good to fade away! These sweet salty addictive candied pepitas bring a similar, yet arguably superior, crunch and flavor explosion to any green or grain bowl. They’re particularly fantastic in autumn-inspired salads. Imagine a vibrant mix of shaved cabbage and fennel, perhaps with crumbles of Manchego cheese, all brought to life by a scattering of these glossy pepitas. The combination of fresh, crisp vegetables, salty cheese, and the sweet, crunchy pepitas creates a symphony of flavors and textures that will make any salad feel gourmet. They also shine in salads featuring roasted squash, beets, goat cheese, or even a simple mixed green salad with a vinaigrette. Their ability to introduce both sweetness and texture elevates a humble salad to something truly memorable.
The Ultimate Standalone Snack
Don't underestimate the power of these candied pepitas as a standalone snack. Once you've made a batch, you'll find yourself reaching for them constantly. They're perfect for satisfying those afternoon cravings for something sweet and crunchy, without the guilt of overly processed snacks. Keep a bowl on your counter for quick grabs, pack them in lunchboxes for a delightful surprise, or bring them out for movie night. Pepitas themselves are packed with nutrients like magnesium, zinc, and healthy fats, making this sweet treat not just delicious but also a more wholesome indulgence. Their sweet salty addictive candied pepitas nature means one cluster often leads to another, so be warned – they disappear quickly!
Step-by-Step Guide to Your 10-Minute Candied Pepita Masterpiece
Ready to create your own batch of these irresistible candied pepitas? Here's how to do it, ensuring that glossy, clumpy perfection every time:
- Prepare Your Workspace: Lay out a sheet of parchment paper on a baking sheet or a clean, heat-proof surface. Have all your ingredients measured and ready, as this process moves quickly.
- Toast the Pepitas: Heat a dry, heavy-bottomed skillet (cast iron works beautifully) over medium heat. Add your raw pepitas and toast, stirring frequently, for about 3-5 minutes. You'll know they're ready when they become fragrant and some may start to puff slightly. Be careful not to burn them. Immediately remove them from the skillet and set aside in a heat-proof bowl.
- Melt the Sugar: Return the empty skillet to medium-low heat. Add the granulated sugar (and a pinch of salt) to the pan in an even layer. Resist the urge to stir immediately. Allow the sugar to begin melting around the edges. As it melts, gently push the melted sugar towards the center with a heat-proof spatula or wooden spoon. Continue cooking, stirring occasionally, until all the sugar has completely melted and transformed into a light amber caramel. It should be smooth and liquid. This usually takes another 3-5 minutes. Watch it closely, as caramel can burn quickly!
- Combine and Coat: As soon as the sugar is a beautiful, light caramel, remove the skillet from the heat. Immediately add the toasted pepitas to the caramel. Stir quickly and vigorously with your spatula to coat all the pepitas evenly. Work fast, as the caramel will begin to cool and thicken.
- Spread and Cool: Pour the coated pepitas onto your prepared parchment paper. Using your spatula or a fork, quickly spread them into a thin, even layer. Don't worry if they clump together – that's part of their charm! Let them cool completely, undisturbed, for about 10-15 minutes.
- Break into Clusters: Once cooled and hardened, break the sweet salty addictive candied pepitas into user-friendly clusters. Store them in an airtight container at room temperature.
For more detailed visuals and expert tips on achieving that perfect glossy finish, be sure to check out our comprehensive guide on Get Glossy, Addictive Candied Pepitas: The Sweet & Salty Secret. You’ll find all the nuances to make every batch a success!
Maximizing Your Candied Pepita Enjoyment & Storage
Now that you've mastered the art of making these sweet salty addictive candied pepitas, here are a few extra tips to ensure you get the most out of every batch:
Storage Savvy
- Airtight is Key: Store your cooled candied pepitas in an airtight container at room temperature. This prevents them from absorbing moisture from the air and becoming sticky or losing their crunch.
- Longevity: Properly stored, they will remain fresh and crunchy for up to 2-3 weeks, though it's highly unlikely they'll last that long once people discover them!
- Avoid Refrigeration: Refrigerating them can introduce moisture and negatively impact their texture, making them soft or gummy.
Creative Flavor Variations
While the classic 3-ingredient version is perfect, these pepitas are a fantastic canvas for additional flavors:
- Warm Spices: During step 3 (melting the sugar), whisk in a pinch of ground cinnamon, nutmeg, or even a tiny dash of cayenne pepper for a subtle warmth and kick. The original recipe from Food and Wine even suggested these very spices!
- Vanilla Extract: A tiny splash of vanilla extract can be stirred into the caramel just before adding the pepitas for an extra layer of sweetness and aroma.
- Citrus Zest: For a bright, zesty twist, add a teaspoon of finely grated orange or lemon zest along with the pepitas.
Gift-Worthy Goodness
These beautiful clusters make a wonderful homemade gift. Pack them in small decorative bags or jars, tie with a festive ribbon, and you have a thoughtful present that's perfect for hosts, neighbors, or colleagues during the fall and holiday seasons. They're a unique and delicious alternative to traditional holiday cookies, and an ideal way to share the joy of sweet salty addictive candied pepitas with loved ones.
For quick inspiration on how versatile these pepitas truly are, especially when time is of the essence, check out our guide on Minute Candied Pepitas: Your Go-To Snack, Salad & Cheese Board Topper – it’s packed with ideas for every occasion.
Whether you're hosting a grand Thanksgiving feast, a casual fall get-together, or simply looking for an irresistible snack to brighten your day, these 3-ingredient sweet salty addictive candied pepitas are your answer. Their ease of preparation, combined with their incredible versatility and undeniable deliciousness, makes them a must-try for anyone seeking to elevate their autumnal culinary creations. So go ahead, toast those pepitas, melt that sugar, and prepare to fall in love with your new favorite fall staple!
